Photoshop: Masking Tutorial
This is an intermediate topic. You will need to possess some basic understanding and have some experience with Drupal content editing.
Permission Level
Level 1 or Higher - See permission level document for details
Recommended Tool
This documentation is demonstrating the use of Adobe Photoshop CC (but it will also be very similar in older versions of photoshop)
Working with Masks
Masking layers is a valuable compositing technique for combining multiple photos into a single image, removing a person or object from a photo or changing part of an image, without permanently altering the original image.
Some helpful guides or resources to review before starting this process.
- Guide to image sizes
- UGA Branding Typography Guidelines
- UGA Branding Color Guidelines
- Installing Typefaces/Fonts
Overview
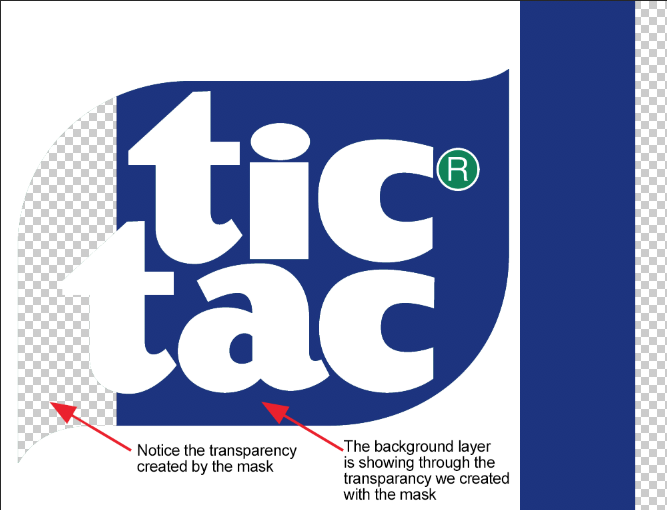
In this very simple tutorial, we will demonstrate the fundamentals of how masking works. We are going to use a two color image and we are going to change the background color from green to another color.
There are several ways to accomplish this like painting directly over the green with a brush, or using the magic wand selection tool to select all the green and filling with another color. These sorts of approaches permanently change the image and once you save the image, they can not be undone. Masking is a way that can be "undone" or changed very easily, even after saving the file.
With masking, we are going to hide the green so that the area that is green now becomes transparent.
Then we will place a layer under the transparent area, and that color will show through. To change the color again we just change the color of the layer underneath.
Original
|
| Final
|


Image Resource: Tic-Tac.png
Steps
Step 1: Open the Image
Open your image by selecting "File > Open" from the file menu and locate the image from your computer. If you need more guidance, use these instructions
Step 2: Create the Selection to Mask
We need to select all the green. The easiest way to do this on this particular file is to use the magic wand tool. This tool works best here because there are clear outlines and color definition. The magic wand only works well for solid color definitions.

Click on the green portion of the image and you will see a dotted outline around it.

You might notice that the green inside of the A and the Registered trademark symbol do not have dotted lines around them. It's because those areas are not touching the other green areas. We have to add those to the selection. Hold down your shift key and you will notice the magic wand tool slightly change - it should have a plus symbol next to it like this:

Now click over the green in the letter A and in the Registered trademark symbol and you will see those areas start to have a dotted line around them.


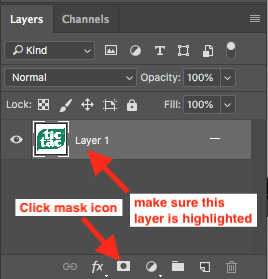
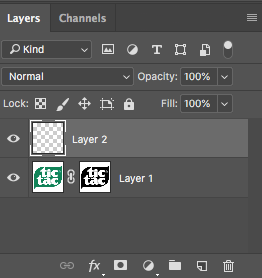
Step 3: Create the Layer Mask
Now that the areas we want to change are all selected, click the "mask" icon from the layers palette, while you have that layer selected.
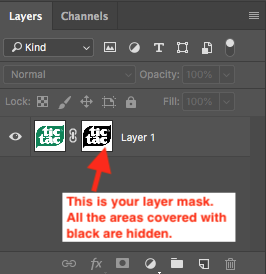
Something unexpected may have happened. You still see the green but the white is gone and transparent!

There is an easy solution to this. From the menu bar, click "Image > Adjustments >Invert" and the mask will reverse and you will see white and no green like this:

One other thing I would like you to take notice of. Notice the layer palette and how you see a new image next to the original image in the layer.
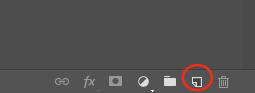
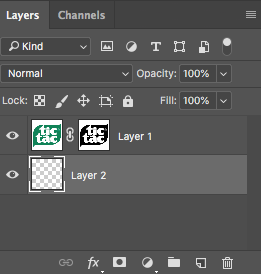
Step 4: Create a New Layer
Let's add a new layer below the layer with the image on it. Click the "new layer" icon at the bottom of the layer palette.
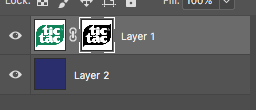
It will probably be above the image layer in the layer palette like this:
Click and drag the layer below the image layer in the layers palette so it looks like this:
Step 5: Add Color to the New Layer
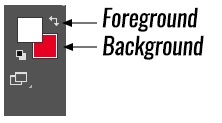
While we are on the new Layer, let's add a different color to the layer. First let's choose a color to add. Click on the "color" selector tool from the tool bar. The color square to the left is the foreground color and the one to the right is background color.
See below.
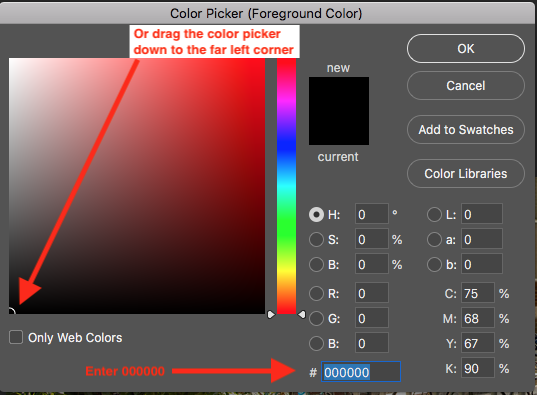
Select the foreground palette by clicking on it, and then a color picker will come up. Choose the color you want to use by clicking in the color picker - it doesn't matter if it is a UGA approved color because this is just a tutorial to show you how masks work. Pick any color.
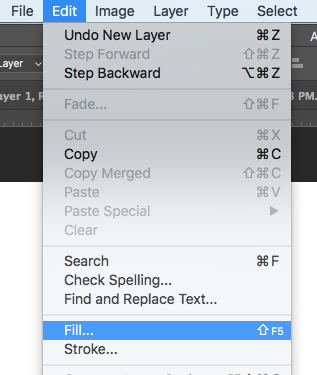
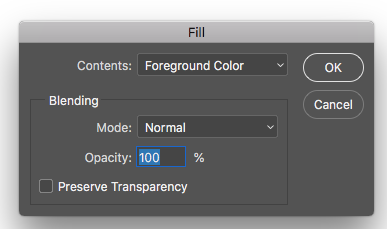
Next, select "Edit > Fill" from the top menu, then choose "foreground color" from the pop up window.
Now your image should look like this with the color you selected.

If you want to try different colors, then just fill that same layer with a different color using the same process.
Step 6: Changing the Mask
You have created your first mask. And guess what - if you decided you want the Registered trademark symbol to have the green instead of the new background layer color, then you can "unmask" that portion of the mask.
Make sure to select the image layer from the layers palette, and then pay special attention to click on the layer mask - that little image next to the original image on that layer. You should see a white outline around it.
Now we are going to uncover some of the mask.
From the color picker, click on the little black/white icon below the color picker to switch the colors back to black and white, and then click the reverse area to make white the foreground color.

Now zoom in on the image so you can clearly see the Registered trademark

Grab your paintbrush tool and start coloring over the blue area on the R. You will see it slowly turn green. You are unmasking the original green so that it is now exposed again.

And this will be your finished product.

Basically a mask, when colored black, "covers" up part of the image so that the layer under it is visible. Coloring any part of the mask back to white, fills the image back in to its original state.
To manage any part of your web site, you will have to be logged into the Drupal CMS.
If you need help logging in, please review this login help document.
Contact the Franklin OIT Help Desk |
Hours of Operation |
Monday - Friday 8:00 a.m. - 5:00 p.m. |
Website Information |
Homepage Directory Service Offerings |
Systems Status Information |
Franklin OIT Status http://status.franklin.uga.edu/ Receive or Discontinue Status and Service Updates from Franklin OIT UGA/EITS Systems Status Pages https://www.facebook.com/uga.eits USG Systems Status Page |
