| Insert excerpt | ||||||||
|---|---|---|---|---|---|---|---|---|
|
You will need to possess some basic understanding of working with Microsoft Office products.
Students often need to reference a schedule of courses for each semester. Currently the only way to see an up to date course schedule is for students to download the single PDF schedule file for all UGA courses and search for the course acronyms. The file is very large and difficult to use on a mobile device.
This documentation will walk you through the steps of creating a styled and filterable spreadsheet of courses that you can link up to your departmental web site.
Example Styled and Filterable Spreadsheet: Demo Course Schedule Link
Step-by-step guide
This document will be broken down into two sections:
- Creating Course Schedule Spreadsheets
- Link up new schedule page to your courses
| Table of Contents | ||||||
|---|---|---|---|---|---|---|
|
Section 1: Creating Course Schedule Spreadsheets
Step 1: Create Microsoft Excel Spreadsheet
Using your OneDrive account, create an Excel spreadsheet which will contain the data for your course schedule for the upcoming semester. Label the spreadsheet by the semester and year.
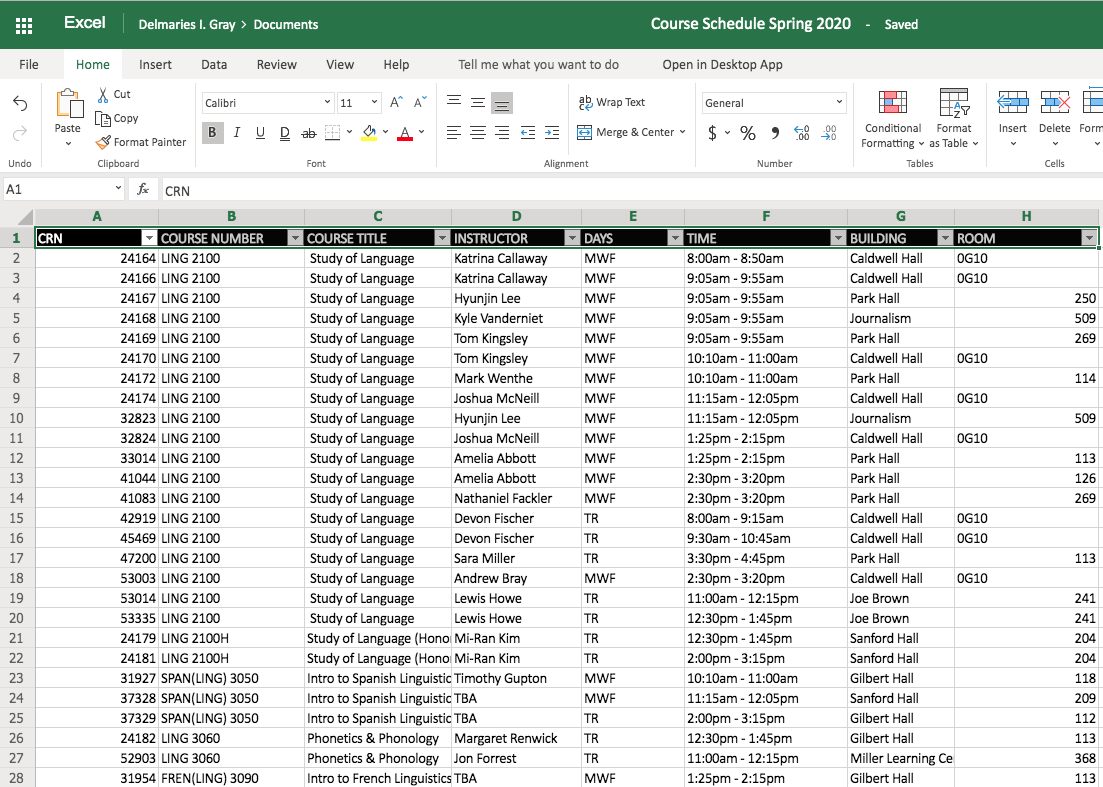
We recommend a format like this:

The first row represents the field names. As you can see, filtering is ON to allow people to filter your spreadsheet.
Select all of your headers, and click 'Filter' under the Data tab.

Here is a link to this example file if you want to duplicate it for your use. To copy it, click the link below, then select everything and copy it into your own blank spreadsheet.
Step 2: Populate your course data
Enter all the relevant data for each course into this spreadsheet.
Step 3: Make spreadsheet public
Click "share"

We have to change it so people everywhere can access this spreadsheet. So, click on 'People you specify can edit'

Click on 'Anyone with the link.' Make sure the 'Allow editing' box is NOT checked. You don't want people to be able to edit the information in the spreadsheet. Click 'Apply.'

Now, copy the link to your clipboard. You will need this link for your website.

Section 2: Add course schedule to site
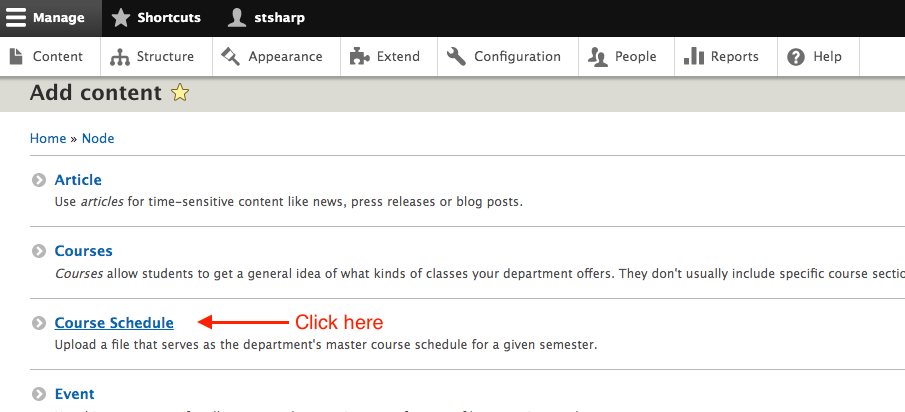
Step 1: Create New Course Schedule
Click blue "Add Content" button.
.png?version=1&modificationDate=1575396026000&cacheVersion=1&api=v2)
Next click "Course Schedule"
Then fill out the fields with the pertinent information

Step 2: Save
Now click the blue "save" button. Now your course schedule will be linked up in the right hand column of all course description pages.
| Insert excerpt | ||||||||
|---|---|---|---|---|---|---|---|---|
|
| Insert excerpt | ||||||
|---|---|---|---|---|---|---|
|